published on
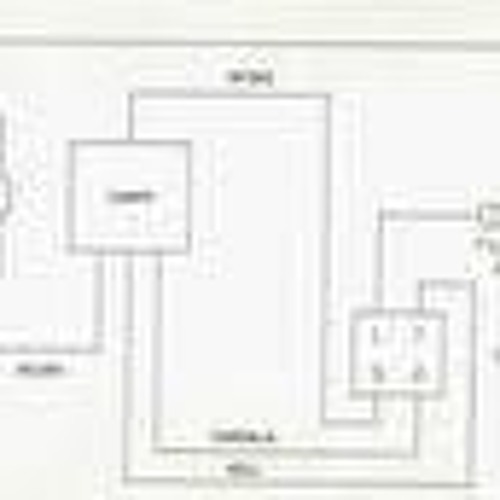 Diagrama Electrico De Licuadora Oster
Download File >> https://blltly.com/2tNcVk
Oster Blender Electrical Diagram: A Complete Guide for DIY Repair
If you have an Oster blender that is not working properly, you might be wondering how to fix it yourself. One of the most common problems with Oster blenders is the electrical wiring and circuitry. In this article, we will show you how to use an electrical diagram to troubleshoot and repair your Oster blender.
What is an Electrical Diagram?
An electrical diagram is a graphical representation of the electrical components and connections in a device or system. It shows how the power source, switches, wires, motors, resistors, capacitors, and other elements are arranged and connected. An electrical diagram can help you understand how the device works, identify the faulty parts, and replace them with new ones.
Where to Find an Electrical Diagram for Your Oster Blender?
There are different sources where you can find an electrical diagram for your Oster blender. Some of them are:
The user manual that came with your blender. It usually contains a schematic diagram of the blender's circuitry and wiring.
The official website of Oster. You can search for your blender model and download the manual or the diagram from there.
The online forums and videos of DIY enthusiasts. You can find many examples of Oster blender electrical diagrams and repair guides on websites like YouTube or Club de Diagramas.
The local repair shop or technician. You can ask them to provide you with a copy of the electrical diagram for your blender model.
How to Use an Electrical Diagram to Repair Your Oster Blender?
Once you have obtained an electrical diagram for your Oster blender, you can use it to diagnose and fix the problem. Here are some steps to follow:
Unplug your blender from the power outlet and remove the jar and the base.
Open the base of your blender and locate the electrical components inside. You might need a screwdriver or a wrench to do this.
Compare the electrical diagram with the actual wiring and circuitry of your blender. Look for any signs of damage, wear, corrosion, loose connections, or burnt parts.
Use a multimeter or a continuity tester to check the voltage, resistance, and continuity of each component and wire. Refer to the electrical diagram for the correct values and connections.
Identify the faulty component or wire and replace it with a new one. Make sure to use the same type and rating as the original one.
Reassemble your blender and test it. If it works properly, you have successfully repaired it. If not, repeat the steps until you find and fix the problem.
What are the Benefits of Repairing Your Oster Blender Yourself?
Repairing your Oster blender yourself can have many benefits, such as:
Saving money. You can avoid paying for a professional service or buying a new blender by fixing the problem yourself.
Saving time. You can repair your blender at your own convenience and pace, without waiting for an appointment or a delivery.
Learning new skills. You can improve your knowledge and understanding of electrical diagrams and devices, and gain confidence in your DIY abilities.
Reducing waste. You can prevent your blender from ending up in a landfill by extending its lifespan and functionality.
What are the Risks of Repairing Your Oster Blender Yourself?
Repairing your Oster blender yourself can also have some risks, such as:
Causing more damage. You might make a mistake or use the wrong part or tool, and end up damaging your blender further.
Voiding the warranty. You might lose the warranty coverage of your blender if you open it or modify it without authorization.
Injuring yourself. You might expose yourself to electric shocks, burns, cuts, or other injuries if you handle the electrical components or wires improperly.
Therefore, before you attempt to repair your Oster blender yourself, you should:
Read and follow the safety precautions and instructions in the user manual a
Diagrama Electrico De Licuadora Oster
Download File >> https://blltly.com/2tNcVk
Oster Blender Electrical Diagram: A Complete Guide for DIY Repair
If you have an Oster blender that is not working properly, you might be wondering how to fix it yourself. One of the most common problems with Oster blenders is the electrical wiring and circuitry. In this article, we will show you how to use an electrical diagram to troubleshoot and repair your Oster blender.
What is an Electrical Diagram?
An electrical diagram is a graphical representation of the electrical components and connections in a device or system. It shows how the power source, switches, wires, motors, resistors, capacitors, and other elements are arranged and connected. An electrical diagram can help you understand how the device works, identify the faulty parts, and replace them with new ones.
Where to Find an Electrical Diagram for Your Oster Blender?
There are different sources where you can find an electrical diagram for your Oster blender. Some of them are:
The user manual that came with your blender. It usually contains a schematic diagram of the blender's circuitry and wiring.
The official website of Oster. You can search for your blender model and download the manual or the diagram from there.
The online forums and videos of DIY enthusiasts. You can find many examples of Oster blender electrical diagrams and repair guides on websites like YouTube or Club de Diagramas.
The local repair shop or technician. You can ask them to provide you with a copy of the electrical diagram for your blender model.
How to Use an Electrical Diagram to Repair Your Oster Blender?
Once you have obtained an electrical diagram for your Oster blender, you can use it to diagnose and fix the problem. Here are some steps to follow:
Unplug your blender from the power outlet and remove the jar and the base.
Open the base of your blender and locate the electrical components inside. You might need a screwdriver or a wrench to do this.
Compare the electrical diagram with the actual wiring and circuitry of your blender. Look for any signs of damage, wear, corrosion, loose connections, or burnt parts.
Use a multimeter or a continuity tester to check the voltage, resistance, and continuity of each component and wire. Refer to the electrical diagram for the correct values and connections.
Identify the faulty component or wire and replace it with a new one. Make sure to use the same type and rating as the original one.
Reassemble your blender and test it. If it works properly, you have successfully repaired it. If not, repeat the steps until you find and fix the problem.
What are the Benefits of Repairing Your Oster Blender Yourself?
Repairing your Oster blender yourself can have many benefits, such as:
Saving money. You can avoid paying for a professional service or buying a new blender by fixing the problem yourself.
Saving time. You can repair your blender at your own convenience and pace, without waiting for an appointment or a delivery.
Learning new skills. You can improve your knowledge and understanding of electrical diagrams and devices, and gain confidence in your DIY abilities.
Reducing waste. You can prevent your blender from ending up in a landfill by extending its lifespan and functionality.
What are the Risks of Repairing Your Oster Blender Yourself?
Repairing your Oster blender yourself can also have some risks, such as:
Causing more damage. You might make a mistake or use the wrong part or tool, and end up damaging your blender further.
Voiding the warranty. You might lose the warranty coverage of your blender if you open it or modify it without authorization.
Injuring yourself. You might expose yourself to electric shocks, burns, cuts, or other injuries if you handle the electrical components or wires improperly.
Therefore, before you attempt to repair your Oster blender yourself, you should:
Read and follow the safety precautions and instructions in the user manual a
- Genre
- Audiobooks